Most often, photographs capture a singular moment, feeling, action or event. With time-lapse photography, however, photographers can capture time itself by showing the constellations revolving in the heavens, a seed growing into a blossoming flower or a single person aging over the years. In addition to capturing time, time-lapse photography allows one to manipulate its perception, speeding it up to reveal subtle changes that are normally invisible to the naked eye.
With special tools, techniques, a bit of planning and the following time-lapse photography tips, photographers can learn how to make a time-lapse to transform their pictures into powerful stories.
Defining Time-Lapse Photography and What Makes It Compelling
A form extensively developed by John Nash Ott as a method for researching plant growth, time-lapse photography captures movements or changes that occur over long periods of time by taking photos at set time intervals and then combining them into a sequence that plays back faster than real time. The process reveals patterns and transformations that normally occur too gradually to notice.
Time Compression, Visual Rhythm and Storytelling
Time-lapse condenses minutes, hours or days into seconds, creating dramatic visual momentum. Repeating movement with a central subject forms a natural visual rhythm that guides viewers through the scene. As light shifts, objects move and environments evolve, sequences create clear narratives of growth, motion, decay or transformation.
Choosing Subjects That Change: Fast, Slow or Cyclical
Compelling time-lapse subjects show visible change over time.
- Fast-moving scenes include crowds or traffic (motion time-lapse).
- Slower processes capture blooming flowers (plant growth time-lapse), construction projects (construction time-lapse) or weather changes.
- Cyclical patterns like sunrises and sunsets (day to night time-lapse), tides, shadows, seasons and the nightly rotation of the stars (astrophotography time-lapse) create visually satisfying loops that emphasize the rhythm of nature.
Common Time-Lapse Formats: Photo Sequence, Hyperlapse and Video
Traditional time-lapse uses a sequence of still photographs captured at intervals and assembled into a video. Hyperlapse photography adds camera movement (which can be achieved with slider time-lapse techniques) between frames to create dramatic motion through space or to anchor a moving focal point within the composition in motion control time-lapse. Some projects use continuous video sped up in editing. However, photo sequences usually provide higher image quality.
Planning the Story Before You Shoot
The best time-lapse projects begin long before the camera comes out. Careful planning helps ensure the sequence captures meaningful change. The following considerations help photographers define the visual narrative and prepare for practical challenges.
Setting a Clear Concept: Process, Place or Phenomenon
Decide what kind of change your sequence will highlight. Some projects focus on a process (like construction or plat growth); others document a location over time, and some capture natural phenomena (like changing light or shifting clouds).
Scouting, Sun Path and Weather Research
Visit locations in advance to test framing, stability and possible obstructions. Study the sun’s path to anticipate shadows and lighting changes. Checking weather forecasts and seasonal patterns helps ensure the conditions support the desired visual effect.
Permits, Safety and Respecting Public and Private Spaces
Extended shooting sessions could require permits in parks, city centers or protected areas. Position equipment safely to avoid blocking pathways or creating hazards. Always respect local rules as well as private property and privacy overall.
Gear Essentials and Practical Setup
Reliable equipment with the right features and thoughtful setup facilitates smooth time-lapse shoots, especially during long sessions. With the right camera choices, stabilization and power solutions, photographers can capture a sharp, consistent and uninterrupted sequence.
Camera Options: DSLR, Mirrorless, Action Cameras and Phones
Many cameras support interval shooting for intervalometer time-lapse projects. Digital single-lens reflex (DSLR) and mirrorless models offer high image quality and manual control. Action cameras are compact and durable for outdoor use, while today’s smartphones provide convenient apps and built-in interval features for simple projects.
Tripods, Heads and Stabilization for Long Sessions
A sturdy tripod keeps framing consistent across hundreds or thousands of frames in long exposure time-lapse photography. Solid tripod heads prevent drift and vibration from wind or movement. For outdoor shoots, weighted tripods or ground spikes help stabilize equipment during extended recording sessions.
Power and Storage: Batteries, External Power and Memory Cards
Time-lapse sessions can last hours or days. They quickly drain batteries and fill data storage. Carry spare batteries, use external power banks or AC adapters when possible. Choose large, high-speed memory cards to handle continuous image capture.
Interval, Duration and Math That Prevents Mistakes
Successful time-lapse photography depends on simple but important calculations. Choosing the right interval and estimating total frames ensures smooth motion and the desired clip length. Getting the math right means getting your camera settings right in addition to preventing gaps, rushed sequences and incomplete recordings.
Picking the Right Interval for Clouds, Crowds and Construction
The interval determines how frequently images are captured. Fast-moving subjects (like clouds or busy streets) may require intervals of one to three seconds. Intervals for slower processes (like plant growth or construction) often range from minutes to hours.
Calculating Clip Length, Frame Rate and Total Frames
To determine the total number of frames you need, multiply your frame rate (usually 24 or 30 frames per second) by the length of the final clip. Then determine shooting duration and interval to capture enough images for smooth, complete playback.
A quick app store search will reveal plenty of time-lapse interval calculator options for all kinds of smartphones. These make it easy to get your time-lapse frame rate and time-lapse interval settings right, no matter the location.
Buffer Time and Redundancy: Extra Frames and Safety Margins
Unexpected delays, lighting shifts or movement interruptions can impact a sequence. Capturing more frames than needed creates a cushion for editing flexibility and can save you from missing moments. Planning extra recording time ensures the final clip remains smooth and complete, even if conditions change.
Camera Settings for Consistent Frames
Consistent time-lapse camera settings are essential for smooth time-lapse sequences. Automatic adjustments can introduce unwanted shifts between frames. Using controlled settings helps maintain stable exposure, color and focus so the final sequence appears seamless and professional.
Manual Exposure and White Balance to Avoid Flicker
Automatic exposure or white balance can change slightly between shots, which results in a distracting flicker in the final sequence. Switching to manual exposure and fixed white balance maintains stable brightness and color across frames to yield a smoother, more visually consistent time-lapse.
Focus Control, Sharpness and Depth of Field
Locking focus prevents the camera from searching between frames. After focusing manually, avoid touching the lens to maintain consistency. Choosing an appropriate aperture helps balance sharpness and depth of field, ensuring important elements remain clearly visible throughout the sequence.
RAW vs. JPEG and When Each Makes Sense
- RAW files capture more image data, providing greater flexibility for color correction, exposure adjustments and range during editing.
- JPEG files use less storage and process more quickly, making them more practical for long sequences or projects that require a quick turnaround.
Avoiding Flicker and Other Common Problems
Even well-planned time-lapse shoots can suffer from visual distractions if technical details are overlooked. Understanding common causes of instability and exposure changes helps photographers anticipate problems and maintain smooth, professional-looking sequences throughout long sessions.
Sources of Flicker: Auto Settings, Aperture Change and LEDs
Flicker often appears when exposure, white balance or ISO changes between frames. Some lenses also produce tiny aperture variations that affect brightness. Artificial lighting — especially LED or fluorescent bulbs — can pulse subtly, creating inconsistent illumination across a sequence.
Holy Grail Transitions: Day to Night Exposure Ramping
Capturing a smooth transition from daylight to night (often called the “holy grail” time-lapse) requires gradual exposure adjustments. Photographers carefully ramp shutter speed, ISO or aperture over time to maintain balanced brightness as natural light fades, shifting from daytime to night time-lapse settings.
Wind, Vibration and Micro-Movements: Stability Solutions
Wind, passing vehicles or unstable surfaces may cause small physical shifts between frames. These micro-movements create jitter in playback. Photographers can keep the camera stable during long captures with:
- Sturdy tripods
- Sheltered locations
- Weighted supports
- Remote triggering
Additionally, some small movements can be addressed in post-production with time-lapse editing software, for example, using After Effects or Premiere Pro time-lapse features for stabilization.
Advanced Techniques, Motion and Movement
Adding controlled movement can transform a static time-lapse into a more immersive, dynamic visual experience. With careful technique and planning, photographers can introduce motion, depth and evolving perspectives while keeping frames smooth and consistent.
Motion Control: Sliders, Pan-Tilt Heads and Parallax
Motorized sliders and pan-tilt heads move the camera slightly between frames to create smooth motion across a scene. This movement introduces parallax (foreground objects shifting relative to the background), which creates depth and a cinematic feel in time-lapse sequences.
Hyperlapse: Walking Paths, Stabilization and Frame Consistency
Hyperlapse techniques involve physically moving the camera between shots, such as along a walking path. Maintaining consistent spacing and alignment between frames is crucial. Later stabilization in editing software helps smooth the motion to create a flowing sequence.
Focus Pulls and Dynamic Framing (Without Ruining Continuity)
Gradual focus changes or subtle reframing can guide viewer attention during a sequence. These adjustments must be extremely controlled to avoid sudden jumps. Small, consistent movements and adjustments between frames maintain continuity while adding visual interest and depth.
Post-Production Workflow
After capturing hundreds or thousands of images, careful post-production editing using Premiere Pro or After Effects time-lapse features turns raw frames into a polished time-lapse video. Organizing files, correcting visual inconsistencies and exporting with the right settings ensures the final sequence looks smooth and professional
Culling, Sequencing and Deflicker Tools
Begin by reviewing and removing unusable frames caused by camera bumps, exposure issues or interruptions. Import the remaining images as a sequence in editing software. Deflicker tools can then analyze brightness variations and smooth them across frames.
Color Correction, Grading and Matching Frames
Consistent color and exposure are crucial for a professional result. Basic corrections balance highlights, shadows and white balance across the sequence. Creative color grading can enhance mood, while synchronization tools help apply adjustments uniformly to all frames.
Export Settings: Resolution, Codecs and Delivery Formats
Export settings determine how the final video will look and play.
- Choose a detailed resolution (e.g., 1080p or 4K).
- Select a reliable codec or ProRes.
- Match frame rates to your editing timeline for smooth playback.
Sound, Editing and Narrative Refinement
Editing impacts how viewers experience a time-lapse project. In addition to focusing on the visual impact, thoughtful choices in sound, pacing and context can strengthen the narrative and its emotional impact. These elements can transform sequences into cohesive stories.
Adding Music and Ambient Sound With Intent
Music helps establish mood and rhythm, complementing the pace of visual change. Ambient sounds (like wind, traffic or nature) add realism and atmosphere. Carefully timed audio cues help emphasize transitions, climaxes and subtle shifts within the sequence.
Titles, Captions and Context for Documentary Projects
Titles and captions provide viewers with helpful context about location, timing or subject matter. Brief explanatory text can highlight the significance of gradual changes, making documentary-style time-lapse projects clearer and more informative for audiences.
Sequencing Multiple Time-Lapses Into a Short Film
Combining several sequences allows filmmakers to build a broader narrative. Varying shot lengths, locations and pacing keep the visual experience engaging. Thoughtful transitions between scenes maintain continuity while guiding viewers through a larger story.
Case Studies: Global Perspectives
Time-lapse photography captures unique rhythms and transformations around the world. Looking at examples of time-lapse photography from different photographers, places and cultures can help inspire creative time-lapse ideas, techniques and storytelling approaches.
United States: Construction Time-Lapse and City Crowds
Documenting urban growth, construction projects and bustling traffic reveals dynamic patterns in fast-moving life across American cities.
Iceland: Aurora and Fast-Changing Weather Systems
Time-lapses or auroras and rapidly shifting clouds showcase Iceland’s dramatic skies and natural beauty.
Japan: Urban Crosswalk Flow and Nighttime Light Trails
Capturing crosswalks, street traffic and neon light trails illustrates Japan’s highly organized yet visually vibrant urban movement.
United Arab Emirates: Skylines, Desert Light and Modern Architecture
Sequences of tower skyscrapers and desert landscapes emphasize the UAE’s striking architectural contrasts and ever-changing light conditions.
India: Markets, Festivals and Ritual Cycles
Time-lapse videos capture crowded markets, festival processions and daily rituals to convey the energy and cyclical nature of Indian culture.
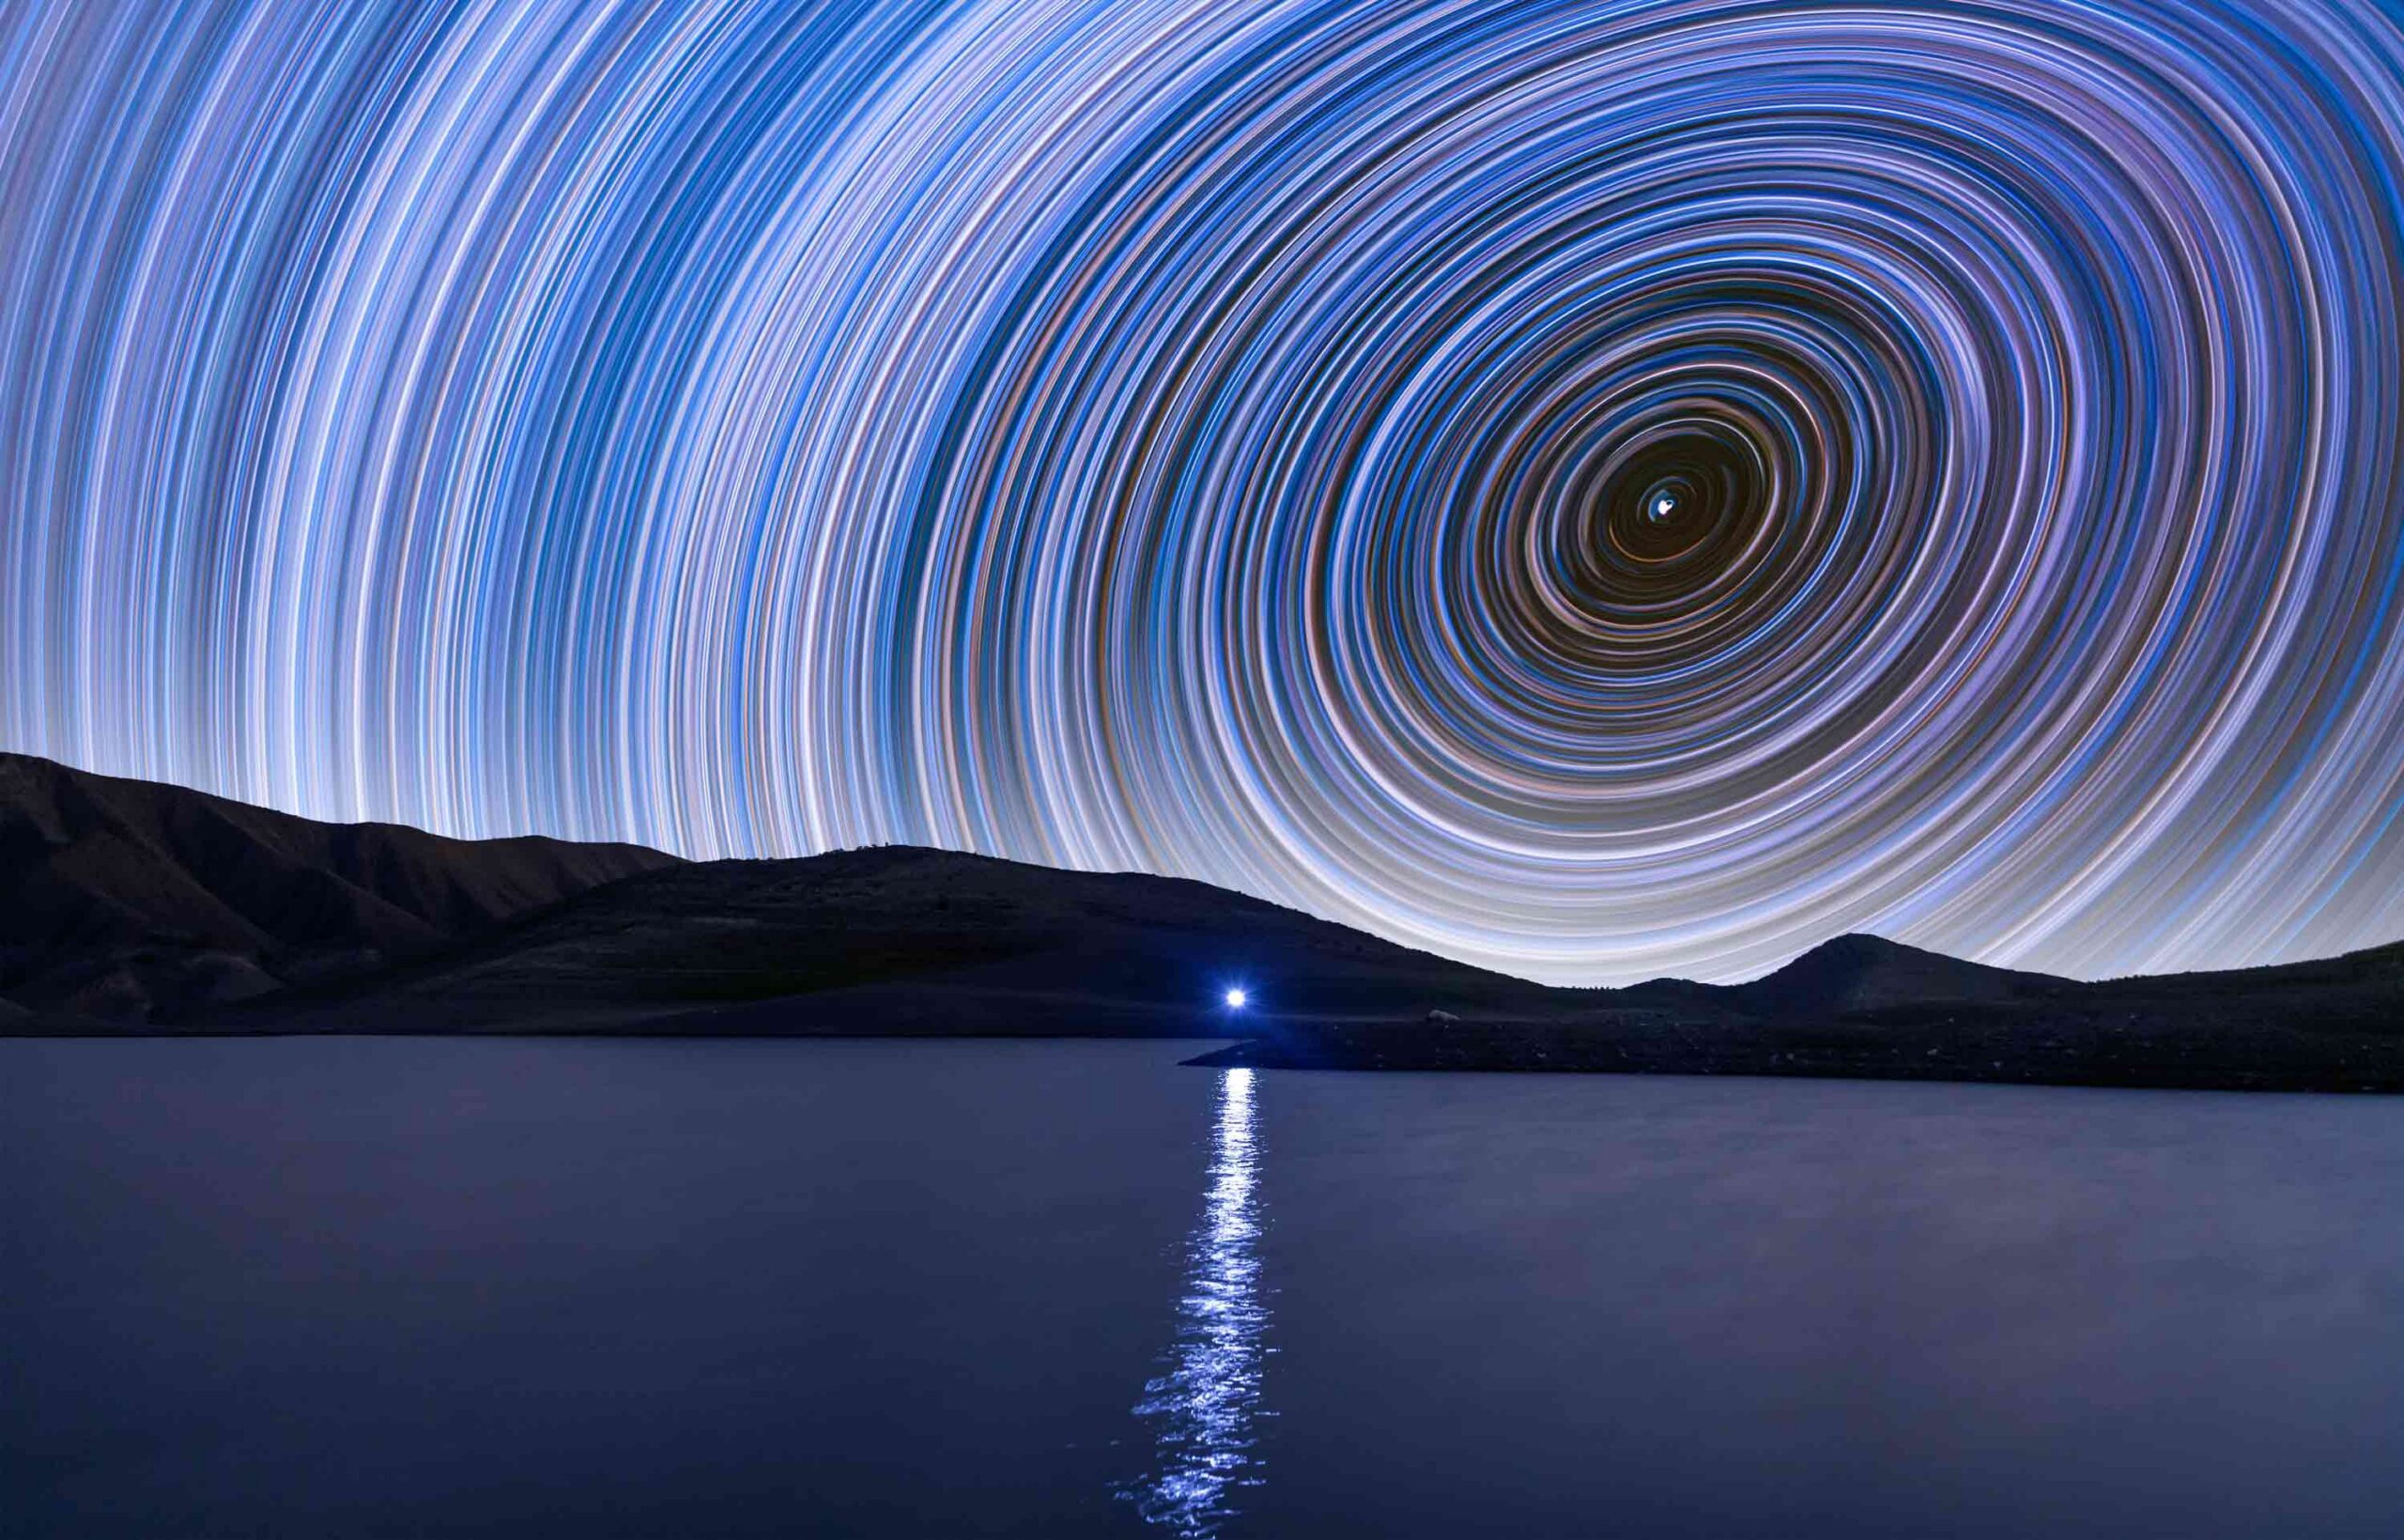
Chile: Atacama Night Skies and Astro Time-Lapse
Astrophotography sequences in the Atacama Desert capture clear night skies, illuminating star trails and cosmic motion over remote landscapes.
Netherlands: Clouds, Canals and Bicycling Movement Patterns
Observing cloud formations, canal reflections and bicyclist flows highlights the unique combination of weather, waterways and urban mobility found in the Netherlands.
Explore Time-Lapse Photography With RMCAD
Successful time-lapse photography projects call for precision, planning and a solid understanding of photography tools, techniques and settings. At Rocky Mountain College of Art + Design, online and on-campus students in RMCAD’s Photography program have the opportunity to study the art of time-lapse photography while developing a comprehensive foundation of photography techniques through structured study, coursework and hands-on projects.
To learn more about time-lapse photography and earning your degree at RMCAD, we invite you to explore our on-campus Bachelor of Fine Arts in Photography and online Bachelor of Fine Arts in Photography or request additional information today.
FAQs: Time-Lapse Photography
Q1: What interval should I use for time-lapse photography?
It depends on subject speed. Fast clouds or crowds may work at 1 to 3 seconds, while sunsets, plant growth or construction often need longer intervals and longer sessions.
Q2: How do I calculate how long my final time-lapse will be?
Final seconds equal total frames divided by frame rate. Plan backward from your desired clip length, then choose an interval that fits the subject’s pace of change.
Q3: Why does my time-lapse flicker?
Flicker usually comes from auto exposure or auto white balance changes, aperture variation or artificial lighting. Use manual settings and consistent white balance to minimize it.
Q4: What is a “holy grail” time-lapse?
It is a day-to-night or night-to-day time-lapse with smooth exposure changes. It requires careful exposure ramping and additional post work to avoid visible jumps.
Q5: Should I shoot RAW or JPEG for time-lapse?
RAW offers maximum flexibility for exposure and color correction, especially in difficult light. JPEG can work for quick workflows if exposure is stable and you need smaller files.
Q6: What is the difference between hyperlapse and time-lapse?
Time-lapse usually keeps the camera fixed, compressing time. Hyperlapse adds camera movement between frames, creating motion through space plus time compression.
Q7: What are the biggest mistakes beginners make with time-lapse projects?
Common beginner mistakes include poor stability, using auto settings, underestimating battery and storage needs and choosing intervals that do not match the subject’s rate of change.
